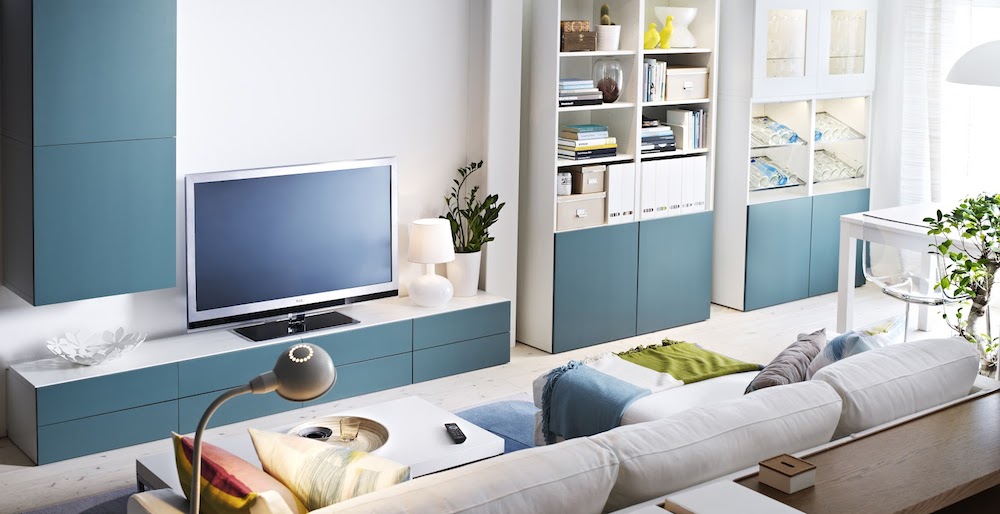
Measure Up Your Ikea Furniture To Make Sure It Fits Into Your New Place
It might sound silly but before you even start thinking about taking apart, moving and reassembling your Ikea furniture, it’s definitely worth visiting the house or apartment you’re moving to and ensuring that your current Ikea furniture will indeed fit. Take a tape measure to see whether your furniture will physically fit into its new position as well as up staircases but also use your mind’s eye and try to judge whether the furniture suits the new place and won’t take up too much of the space, particularly if you’re downsizing.
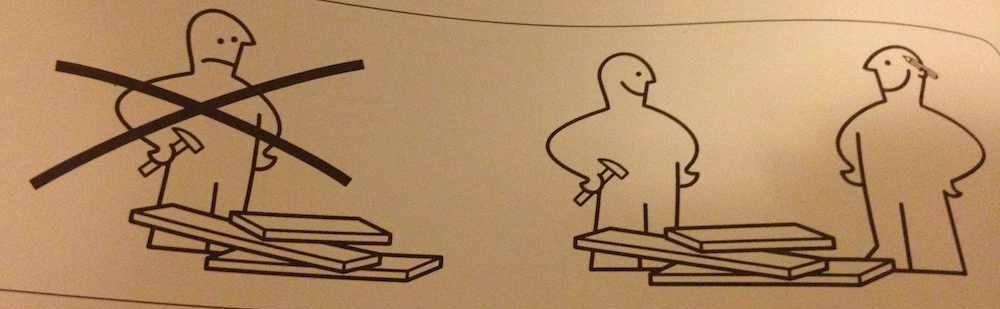
Ask Someone To Help You Carefully Disassemble Your Furniture
While the Ikea instructions often incorrectly claim that two people are required for assembly, when it comes to taking apart large pieces you should definitely do it together. Ikea furniture is only designed to be structurally strong when fully assembled and so if screws are unfastened while disassembling then some panels might be unsupported and liable to fall over – possibly snapping. For this reason it’s worth involving as many people as possible while taking apart to keep everything aligned.
If you’re on your own then one relatively foolproof way to take apart your Ikea furniture is by following the instructions backwards. You could also try simply starting at the top and working downwards with smaller pieces.
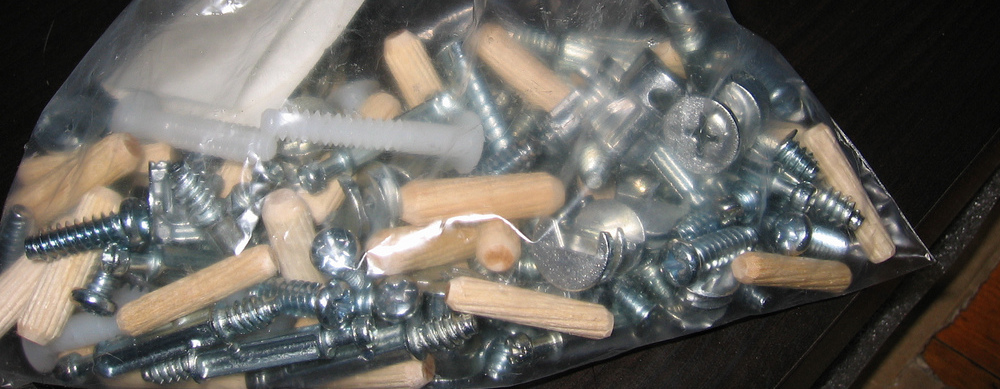
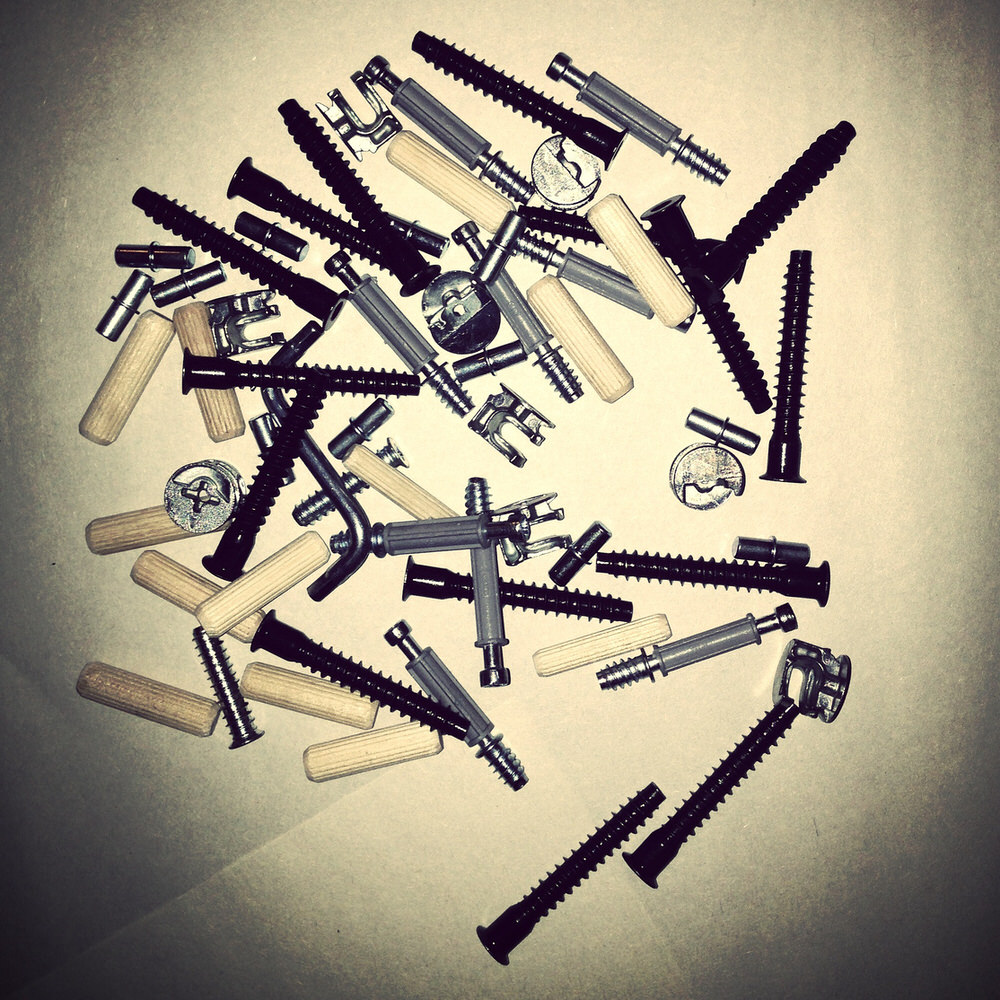
Keep All Your Screws Together In A Plastic Bag (and Don’t Lose The Bag)
There’s nothing worse than getting to the other end and discovering that you’ve lost some screws which is easily done during the hard work and stresses of moving house. The best solution is to bag up your screws and dowels into little plastic sachets and either tape them to one of the panels or keep them all in a folder. If worst comes to worst remember that Ikea helpfully provide spare components at their in-store help desks but this is a hassle you could really do without when moving.
Layer Up Padding Between Flat Pack Panels When Transporting
When loading up the flat pack chipboard panels during a move, the surfaces can easily become scratched and dented. It’s a good idea to layer up with newspapers or towels between panels to pad out the pieces and to prevent them from sliding around and scuffing in transit.
Don’t Worry About Finding Old Instruction Manuals; Download PDFs From The Ikea Site
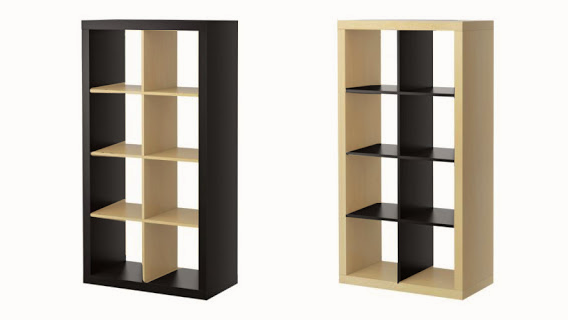
 No need to ransack your house looking through drawers for the instruction booklets to your Ikea furniture as luckily Ikea provide all the instruction manuals for free on their website as PDF files. The links to these files aren’t immediately obvious to find but if you go to the product page for the furniture piece concerned you’ll find the instructions under Product Information > Documents. For example here are the instructions for a 2×4 Expedit (Kallax) shelf.
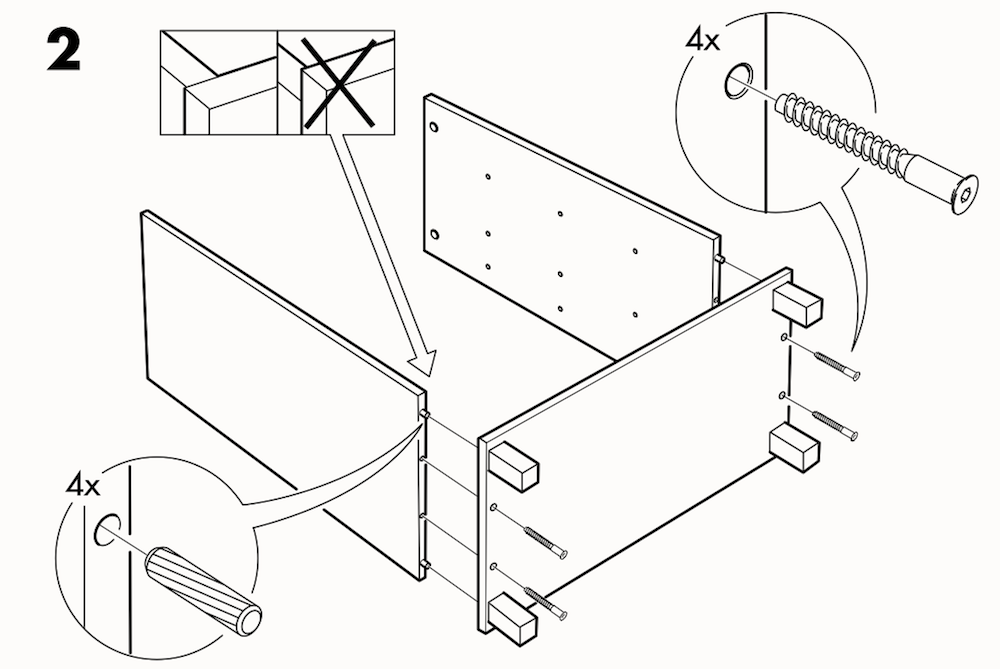
Be Extra Careful Not To Over-Tighten Screws When Reassembling
Some say that it’s best not to remove some of the most crucial screws when disassembling your furniture as they become weaker when refitted. There is some truth in this but I’ve found that as long as you’re extra careful when reassembling it doesn’t cause a problem. Be sure not to over tighten any screws as they can easily shred the chipboard material inside the panels giving the screws nothing to ‘bite on’.
The alternative is to leave the screws in place but this can make it hard to efficiently load up the panels when moving. There’s also the risk of the jutting-out screws getting knocked perpendicularly which could tear the chipboard rendering the entire furniture piece useless.
If Possible Reverse Panels When Re-Making So Scuffs and Scratches Are At The Back
After many years of use your Ikea furniture might be showing some signs of wear and tear, particularly with regards to scratches and dents on the edges of the panels. When reassembling your furniture, it’s possible with some pieces to reverse the panels putting the faces that were previously facing the wall towards the front. I did this with my Expedit shelves when moving last year and although it was a bit time consuming, was definitely worth it.
If you find scuffs on both sides of the panel, you might want to take this opportunity to retouch the edges with some paint. You can do a few quick dabs to cover most scuffs but if you want to do a proper job then read how to paint Ikea furniture in our guide to make sure the paint sticks.
Mix and Match Panel Colours of the Same Pieces for Unique Furniture
This is an optional extra but can be a breath of fresh air for your Ikea furniture. If you liked a piece of furniture so much that you decided to get another one later on in a different colour, then it can be fun to mix and match panels to get a unique technicolor version. I did this last year with black and white Micke desks and Malm chests of drawers and they ended up looking great. If you decide you don’t like it then they can be easily switched back. We touched on this idea before in our list of ways you can customise Ikea Kallax or Expedit shelving.
Some Pieces Are Worth Keeping In Tact While Moving Such as Malm Drawers
Before you make a dash for the screwdriver and start dismantling your furniture, it’s definitely worth carefully deciding whether it’s worth taking apart, particularly with smaller pieces. When I moved I decided to keep my Malm chest of drawers intact and merely removed the drawers while carrying it. The shell of the unit was light and sturdy enough to lift in one piece and what’s really handy is that you can slide the drawers out, fill them up with smaller items and the insert them back into the shell of the Malm once it’s loaded into the van.
If you have any other tips for moving your Ikea furniture, please leave them in the comments below so that others may benefit from your wisdom.
Share this Post


Comments
I’m trying to take the glass doors off a syvde display cabinet and can’t figure out how. Any truck to this would be appreciated
Hello, has anyone taken apart a Hemnes chest of drawers (3)?
Hi all, I have to disassemble and move an old (2000 ca.) KAVALJER shelf with upper glass cabinet and nine drawers where I keep my mineral collection… manuals this old seem impossible to get, any idea? Thanks!
Hang onto your original manuals, or scan them!
Yes, you can download from the IKEA website, but only for items that are currently being sold. Fittings change, construction methods change, products change and hardware changes! I tried to find instrux for my 2009 Komplement fittings today with no success.
How do you disassemble a Lekman cube without breaking the plastic clips? Anyone?
Any way to take apart Ikea plastic boxes? They click together and I am afraid that if I push too hard I will break them.
Hi
My daughter and i have just spent 4 hours assembling the malm chest x2 to find we have incorrectly put together the frame
My qustion is how do you get the self tightening screws out??
First, loosen it by turning it with a screwdriver – then take a long screw (like the ones supplied with the knobs to the dresser), insert it into the cam and turn slightly just until it grabs, then pull it out.
Hi I want to change my five door ikea cupboard into a three door and two door one any tips? much appreciated
Hi
I’m selling off my LAPPLAND TV storage unit and need to unit what’s the best way to disassemble it?
Any pointers on where to start would be great!
Hi. Can anybody tell me how to disassemble an Ektorp sofa, please.
Hi. Did anybody answer the question about disassembling an Ektorp sofa? I just bought one and can’t pick it up unless it does come to pieces and go back together again.
Do you know how to remove Ikea Pax wardrobe doors with Komplement soft closing hinges? Can I undo/disconnect the hinges without removing the screws? If not should I remove the screws from the door or the cabinet?
I need to move a sofa bed downstairs. What is the best way to disassemble after taking cushions off?
I am trying to take a sliding door off a pax wardrobe. The door on the left, which is at the front, will only come off the rail on the free side (left) it won’t lift off the tracks on the right, it is stuck at the bottom. Am I missing something?
I think I have checked the installation instructions correctly and undone the fixings in reverse…. Stuck!
I have the same problem as several other people…I’ve hammered in the plastic screws and need to get them out. My experience is due to putting the bottom piece of a drawer in backwards. I need to turn it around but have to undo the screws to do so. Anyone have an answer?
Hi!
I am trying to disassemble an älvros sofa of 3 seats
If you can point any video or resource we will be eternally greatful! we are indeed suffering a lot to make it go through the staircase!
Thanks a lot!
Hi,
I’m trying to decide if it’s worth it to disassemble and then reassemble my Brimnes 4 drawer bed in a move that’s coming up. Do you know if there’s anything to consider in terms of how much of it to take apart? I’m also a bit concerned that i over-tightened some of the screws to the point of shredding the outer part, I’m not sure if there’s some advice you can give to help deal with this?
Thank you in advance!
Hi! I was just searching because I was wondering the same thing as you. How did you make out?
Hi! I was just searching because I was wondering the same thing as you. How did you make out?
Chest of drawers assembled on site at top bedroom.
Zero chance of making turns needed to get out of house.What do I do to move out furniture to take to. My new home ????
Like you, Diane Waddington, I am putting together the Norden table but have mistakenly put a plastic screw in the wrong place. How do I get it out? There is no groove for a screw-driver and my clawed hammer is trashing the finish. Any ideas?
Hi
I’ve put 2 of the plastic round things in the wrong place, I should have used the metal ones and I can’t get them back out! Building Malm 6 chest of draws.
Please help.
Can anyone help me with information about disassembling an Ektorp couch which I need to put into a basement room. I would probably only need to take off one arm to get it down the stairs but is this possible without damaging the structural integrity of the couch or should I just forget it
Did you get good advice for this problem? I am in the same boat.
hi i have the hemnes day bed and have to move it from one room to the other. do i have to disassemble the whole day bed or can i just do the side and back boards? thanks
How did this move go for you? I am moving the same daybed in a few hours and only plan to take apart the side and back walls, thin front metal bar with slats. The top edge trim has me worried tho. Tips?
Hi there,. We have the Hemnes bedroom series and have the option to buy some additional items second hand so we will need to disassemble to transport them home. A number of items such as the wardrobes will have had the hardboard backing nailed/tacked on to the back. What is people experience of taking this off during disassembling? Is it worth tapping it from the inside if I can to avoid damaging the wooden frames.
Hi Scott, gently tapping it from the inside would be your best bet.
hello and help
I’m disassembling a solid wood ikea bookcase.
Do you know how I undo the ‘large round cross screws’ on an ikea bookcase? They’re the same as these ones on page 17 of the manual for this bookcase:
http://www.ikea.com/gb/en/catalog/products/40282130/
when I turn them in either direction there’s an almighty splitting sound
Hilary
We’re downsizing and looking for IKEA expedit/ kallax units. Since the assembled units wont fit in my car and i can’t arrange for a truck, I might have to buy used dissembled shelves. My only concern is the pieces might not go back perfectly well/ the screws might loosen resulting in un sturdy shelves. Is this right?
Screws loosening can be a problem with Ikea furniture but Expedit units are least affected by it in my opinion. All of the internal boards slot together with simple dowels, and the only screws (which secure the top and bottom to the side boards) are very sturdy indeed.
Any ideas or help on disassembling the Bekant desk from Ikea. I am having difficulties finding assistance. We need to remove the skeleton that attaches to the desk after the legs are attached.
We just took apart and moved 6 PAX super tall storage units. We put masking tape on all the pieces to label what they were, such as Gary right, Gary top, Gary bottom, etc, and used an arrow to show which way was up. For some areas of them we took pictures to remind us how they looked and where some of the metal pieces were screwed in. We did not take out the screws in that hook into those round pieces. (I know that probably makes no sense) but basically we did not unscrew the things that attach to the top and bottom of them and we did not take out the shelf holder doodads. It all went well but I will say that now that we have reassembled, they are definitely not quite as tight and sturdy as they were. But they still work fine and there was no way we could move them without taking them apart because they are so tall.
We did move a Malm dresser and billy bookshelf without taking them apart and that was totally fine.
I am needing some help please. I am right in the middle of putting my Ikea 4 drawer Brimnes chest of drawers together and have found before nailing the back on that I have put the top part the wrong way around meaning the shiny side that should be facing out will be facing the back if I continue. Is there any way of reversing those plastic screws that seems to tighten everything up as I am having all kinds of hassles. Please can someone help. Thanks
Hi Deb, if you’re talking about the plastic screws I think you’re talking about (the barbed screws that you hammer in?) then there is a danger of tearing up the chipboard inside if they are pulled back out. Or do you mean those small flat screws that slot into holes and are twisted once to secure other screws in place? If so then they can be easily reversed to the neutral position and the top part removed.
I’ve assembled my KALLAX shelving unit and I’m trying to install the KALLAX cupboard insert. When doing this there are no pre-existing holes to wheres the cupboard insert would fit in. Can anyone help? As it looks like I need to make holes into the KALLA shelving unit.
Yep, that’s correct. At least with my Expedit drawer inserts there were no pre-existing wholes (otherwise there’d be unsightly holes on the walls of each compartment incase you wanted to put in insert in).
You’ll have to position the cupboard insert how you want it, and then screw through into the planks. You’ll need to put quite a lot of pressure on the screw to pierce the plank’s covering until the screw has something to bite on and pull itself in.
Useful tips. I was also looking for best ideas for keeping the furniture pieces together once dissembled. I’m sure I’m not the only one not to keep the packaging from assembly furniture items. Like for Expedit shelves, a belt or strap to keep them together? Or a big plastic bag and string?
Warning, careful what you hold on to when lifting. We just moved a big Malm chest of drawers – took the drawers out and moved it fairly easily but at the last minute I went to lift it by one of the cross bars and it just broke, oops. So we had to take it all apart after all, glue the broken bit, and put it back together.
Thanks for sharing your (rather unfortunate) story. Those cross bars do indeed look quite frail and it’s also worth making sure that the screws are tightened and the unit is kept square when moving it to make sure there’s no movement/stress on these pieces.
Any suggestions on dissaembling the Malm bed? Is there a way to disassemble in 3 parts ( headboard, footboard, and the side panels) without ruining everything and having to put so much back together?
I moved my malm bed last year and found it to be one of the easiest pieces of Ikea furniture to disassemble (although definitely requires 2 people). It basically does already come apart into the headboard, footboard and two side panels quite easily with a few big recessed screws/bolts at the corners. The metal runners attached to the sidebars can of course be left attached although pad them with a towel or something them while moving to avoid scratching other things.
The wooden slats can be rolled up, and the central metal core that runs from the headboard to footbar simply slides out and collapses telescopically. Finally (from memory) there are a few thin metal cross bracers that run between the sides and this central core. These can be a bit fiddly but definitely need to be taken out and screwed back together as I think they would be fragile if bent the wrong way. Good luck!
How do you reach the blots on each corner of the bed to loosen them without first removing the metal runners that support the box spring/mattress? The metal runners on my bed are long enough that they cover the holes that give access to the bolts in each corner. Help!!
-Corinne
In that case I’d recommend removing the metal runners as well.
Is your’s a Malm bed? Mine was but perhaps there are some variations in sizes that allowed me to leave mine intact.
Everything you need to know is in this article. I would say though that at least in my opinion the most important part is to get all the screws and stuff in a bag. Even if you scratch some of the parts you can always pain or get a foil of some sort, but some of the screws they use are not by any means what you would call “universal” and they are hard to find if you lose them. Plus, they are easy to lose!